I’ve had the pleasure of using Vue since early last year, and have also been a Typescript fan. In a previous project I used React with Typescript, and it was a seamless experience. With Vue I had somewhat stayed clear of combining them both, but as of Vue version 2.5 there has been some improvements with support. See Upcoming TypeScript Changes in Vue 2.5 by Evan You.
In this post I will assume you already have some experience with Vue and Typescript, so you’ve most likely bought into the why you should/could use the framework and tools together. If you would like to know why you should use Vue or Typescript, drop me a note in the comments for a follow up. My goal in this post is to guide you step by step on how to set up a project from scratch, using the vue-cli to end state a working Vue app integrated with Typescript. Also, I’ll cover some issues you might encounter. Some blog posts only show the best case scenario with everything working correctly out the gate, while my experience at times, has been the opposite. I’d like to add there are various starter typescript and Vue projects out there. Hopefully this guide will help you if this initially wasn’t your direction or if you are generally interested in the setup.
Getting started now
In order to get started you need the vue-cli, the use case is to scaffold Vue projects easily. Using Vue templates is a way to specify the type of vue project that you want, and in this case, we are going to use the standard webpack template. The standard webpack template will scaffold a very simple Hello World app with webpack as the build system.
One of the wonderful things about open source is that you can always check the latest branch of a prospective library you want to use. In the future release of the vue-cli issues and setup steps mentioned in the article may just go away. The Vue team is currently working on the next version and if you want to follow the discussion check that out here vue-cli 3.
First Step Project Scaffolding
Prerequisites
- Have node installed
Project
npm install -g vue-cli
vue init <template> <project-name>
vue init webpack vue-typescript-webapp
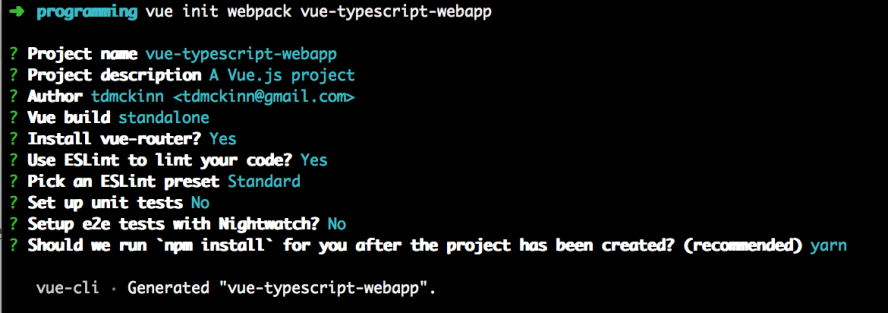
During the kickoff of the previous command in your terminal, powershell, or windows-ubuntu shell you should see something like the following below, and there you will then enter your information.

Second Step Starting the Project
Once your finished answering the series of questions and the project is generated, the following commands take you to your project directory and get the app running. This will prove the project works as is.
 cd vue-typescript-webapp
 npm run dev
At this point you have a Vue Hello World application with a fairly robust build setup using webpack / babel. In my opinion, adding the typescript dependencies before you remove all the babel dependencies has resulted in a quicker setup for me. Note: most likely you don’t need both babel and typescript. Typescript like babel can compile down to ES5 or target ES6. Removing babel is completely up to you and your needs for your project.
Before continuing to the next step you can go ahead and stop the current application from running in the terminal Clt + C.
Third Step Integrating Typescript
Create a tsconfig.json file to get started in the root directory with these configurations. Base recommendations for a vue tsconfig. The configurations I’ve needed to get things working are located below.
{
 "compilerOptions": {
   "lib": ["dom", "es5", "es2015"],
   "target": "es5",
   "module": "es2015",
   "moduleResolution": "node",
   "sourceMap": true,
   "emitDecoratorMetadata": true,
   "experimentalDecorators": true,
   "allowSyntheticDefaultImports": true,
   "allowJs": true
 }
}
Install the following npm packages
yarn add typescript ts-loader --dev
or
npm install typescript ts-loader -D
At this point we have a tsconfig file indicating that this project is a typescript dependent project. My recommendation is to install typescript locally, so you can ensure ts-loader works as expected; otherwise you will need to have typescript installed globally outside your package.json. The ts-loader package is used during the next step in our setup within our webpack configuration.
Modifying the webpack
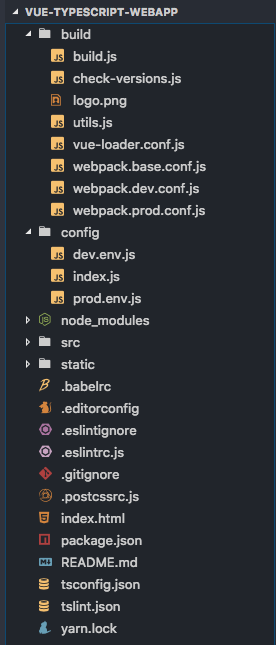
The vue template that was used will generate a project directory structure. See image below.

As you can see there are multiple webpack config files and babel is still in place. The next thing we want to do is add a rule to webpack.base.config
{
 test: /\.ts$/,
 exclude: /node_modules|vue\/src/,
 loader: 'ts-loader',
 options: {
   appendTsSuffixTo: [/\.vue$/]
 }
}
The entry point to the application can now be changed to a .ts extension. Find main.js in the src directory, and once the change is complete, you can also change the entry point within the webpack.base.config
entry: {
   app: './src/main.js'  -> './src/main.ts'
 }
For resolving an additional file extension you will also need to update the resolve config in webpack.base
resolve: {
   extensions: ['.js', '.vue', '.json']
    ->
      ['.js', '.vue', '.json', '.ts']
}
Additions for typescript tooling
- Create and add a
sfc.d.ts or vue-shim.d.tsto the src/ root directory. This primarily helps the build tools, otherwise it may have issues finding the correct components with the .vue extension.
declare module "*.vue" {
 import Vue from 'vue'
 export default Vue
}
Related error without the declaration file
error  in ./src/main.ts
[tsl] ERROR in /Users/me/Documents/programming/vue-typescript-webapp/src/main.ts(4,17)
     TS2307: Cannot find module './App.vue'.
Running the app
To summarize to this point we have generated a hello world project (fresh) with babel, webpack, vue, vue-router and all that good stuff. At some point typescript has been introduced to your project by luck, brute force, etc… We’ve installed the needed typescript packages, changed configurations, and modified the entry point to our application with main.ts. At this point, the primary goal is to see with only the current changes, will the project run successfully.
npm run dev
Throwing in one selling point, using VS Code alongside typescript is that it’s really useful for catching simple mistakes and getting a good idea of what the API’s of your chosen framework or lib are without leaving the editor. Anything you need more in depth or clarification about you can always check the docs.
In the image pictured below you can see the typescript compiler is yelling about assigning a string to a boolean. Very simple warnings and notifications provide for a better developer experience.

If the application starts up fine for you skip - # Possible common errors
Possible common errors
[tsl] ERROR
     TS18002: The 'files' list in config file 'tsconfig.json' is empty.
@ multi (webpack)-dev-server/client?http://localhost:8080 webpack/hot/dev-server ./src/main.ts
Module build failed: error while parsing tsconfig.json...
Fix - Your missing a tsconfig.json file at the root directory, add a tsconfig.json file there
error  in ./src/main.ts
[tsl] ERROR in /Users/me/Documents/programming/vue-typescript-webapp/src/main.ts(4,17)
     TS2307: Cannot find module './App'.
Fix - Go to the main.ts file change import App from ’./App’ -> import App from ’./App.vue appending the extension should do the trick for that one.
Targeting typescript in a Single File Component (SFC)
I really enjoy using the SFC way of building components. Vue happens to be really flexible in the way that you can build them, its all about preference. Here we will target typescript in our .vue files looking at the example below. I’m specifically using HelloWorld.vue
Adding a lang target with the value of “ts” to the script tag allows us to start using typescript as if it were its own .ts file. You can play around with typescript features now directly in this file Typescript Docs.
<script lang="ts">
import Vue from 'vue'
interface IHelloWorldLogger {
   msg: string;
}
export default Vue.extend({
 name: 'HelloWorld',
 data () {
   return {
     msg: 'Welcome to Your Vue.js App'
   }
 },
 created () {
   this.logger({ msg: `The Best Hello World Today` })
 },
 methods: {
   logger (logger: IHelloWorldLogger) {
     console.log(logger.msg)
   }
 }
})
You’ll probably notice, after a while, if you’re trying to tag on typescript annotations to the exported default object the context of this won’t be working as you might expect. Using the class based syntax is really the solution. The quote below is from the article mentioned about Typescript support in 2.5. Using Vue.extend does provide some type inference but the latter feels somewhat better.
However, the current integration is somewhat lacking when using the out-of-the-box Vue API. For example, TypeScript cannot easily infer the type of this inside the default object-based API that Vue uses. To make our Vue code play nicely with TypeScript, we have to use the vue-class-component decorator, which allows us to author Vue components using a class-based syntax.
That being said you can definitely use the object based api as long as you understand the typescript limitations there. Moving on let’s check out the class based syntax.
Vue Class Component - Optional
- Install the npm package
npm install vue-class-component or yarn add vue-class-component - Create new component
BaseWorldDecorated.tsin components directory - You can create components outside the SFC .vue files and create components with logic / helper functions to extend your UI component
- Create EssentialLinks.vue
The source code for what’s needed in each one of the new files is below. The HelloWord.vue file will be changed to use the class based syntax and extending from BaseWorldDecorated.ts. It also will use the newly created EssentialLinks.vue. If you need to see exactly what HelloWorld looks like with those changes check out the code here HelloWorld.vue
import Vue from 'vue';
import Component from 'vue-class-component';
interface IHelloWorldLogger {
  log: string;
}
@Component({})
export default class BaseWorldDecorated extends Vue {
  msg: string = 'The Best Hello World Today';
  // computed
  get computedMsg() {
    return 'computed ' + this.msg;
  }
  // method
  logger({ log }: IHelloWorldLogger) {
    console.log(log);
  }
}
Vue Property Decorators may be useful as well if you decide to go with class components. Type inferences seem to work better with prop declarations using this method.
<template>
  <div class="essential-links">
    <h2>Essential Links</h2>
    <ul>
      <li v-for="item in links" :key="item.id">
        <a :href="item.link" target="_blank">{{item.text}}</a>
      </li>
    </ul>
  </div>
</template>
<script lang="ts">
  import Vue from 'vue';
  import { Component, Prop } from 'vue-property-decorator';
  @Component({})
  export default class EssentialLinks extends Vue {
    @Prop({ default: [] })
    links: Array<string>;
    // lifecycle method
    mounted() {
      console.log(this.links);
    }
  }
</script>
With the latest changes, we have shown typescript works throughout the project in standalone files as a lang target and vue class components. If you run into any issues you can always refer to the end solution. An issue I ran into my self was while it’s possible to extend a base Vue component like BaseWorldDecorated.ts to HellowWorld.vue, the logger method that is inherited from BaseWorldDecorated works in the HelloWorld’s template, but fails if used within the actual vue class component.
@Component({
 components: {
   EssentialLinks
 }
})
export default class HelloWorld extends BaseWorldDecorated {
 mounted () {
   // Error incountred: Property 'logger' does not exist on type 'HelloWorld'.
   this.logger({ log: 'I just want to log' })
 }
Optional Step - removing unneeded resources
First stop the app and then decide if you want to remove dependencies step by step or all at once.
Step by step
- Remove both babel and eslint dependencies one by one via
yarn remove or npm uninstall - once complete start the app
All at once
- Remove both babel and eslint dependencies all together in the package.json
- delete lock file
- “yarn or npm install`
- start the app
The application should start back up and be running fine with your custom typescript setup.
In closing
Here are some recommendations for tooling in the Vue development workflow if you don’t already have them ;)
- VS Code
- Vetur
- Prettier / VS Code
- Tslint
The src code for this project is located Vue-Typescript-WebApp. My hope is the provided information will help you get started, as well as help those who have already started Vue projects and want to integrate typescript. Thanks for taking the time to read!